Guide
Click Here to Visit the Official MiSTer Wiki
Kit Configuration:
- Configure the 4 DE10-nano switches according to the DE10-nano switch table.
- Connect DE10-nano's DC jack to USB hub DC jack using included DC jumper.
- Modify MiSTer.ini for your setup.
- Install the HDMI jumper (IO Direct analog video only).
MiSTer.ini (IO Direct, IO Analog Pro, MiSTercade, etc.):
MiSTer.ini holds the low level settings for MiSTer FPGA. Settings such as audio/video resolutions, core notifications, player # assignments, etc. are contained in the file.
It's in your best interest to familiarize yourself with MiSTer.ini. To help you out, I uploaded some starter files to get you up and running.
Rather than clutter up this page, I created a Github repository for these INI files for my products: https://github.com/misteraddons/mister_ini
DE10-Nano Switches:
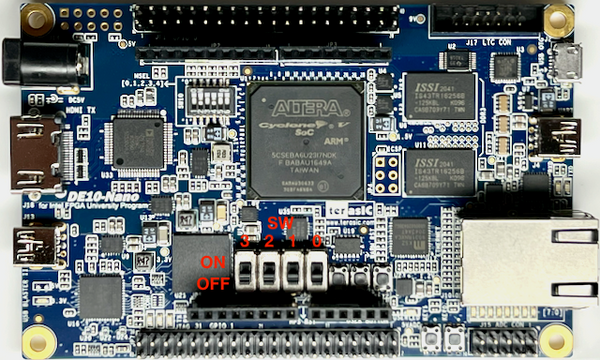
The DE10-nano should be configured for different IO boards as follows:
| Build | SW3 | SW2 | SW1 | SW0 |
| IO Analog / IO Analog Pro (SPDIF) / MiSTercade V2 (DAC Module) | OFF | OFF | OFF | OFF |
| IO Analog Pro (Analog Audio) / MiSTercade V1.X | OFF | OFF | OFF | ON |
| IO Digital / IO Direct / MiSTercade V2 (Direct Video) | ON | OFF | OFF | OFF |
Reflex Adapt Setup:
- Copy the reflex_updater.sh script to the “Scripts” folder of your MiSTer’s SD card
- If using FileZilla, set "FTP Transfer Mode" to "Binary"
- Run reflex_updater.sh on your MiSTer by selecting it in the Scripts menu
- CRT users, make sure you can see the output of scripts on your CRT or the updater won't work with one of these options:
- Option 1: fb_terminal=0
- Option 2: add these to MiSTer.ini to scale your Menu core to 15kHz (won't display on HDMI)
- Run your preferred MiSTer updater to download the Reflex Adapt mappings
- Full manual here: Manual
Heatsink Removal:
Aluminum Case Assembly:
NOTE: NYLON WASHERS NOT NEEDED!
MiSTercade Assembly and Overview:
Top plate washer install trick:
MiSTercade Remote Case Assembly:
mt32-pi Installation
![]()
-
Follow the steps here: https://github.com/dwhinham/mt32-pi/wiki/MiSTer-FPGA%3A-Setup-and-usage
- Edit mt32-pi.cfg and replace "scheme = simple_buttons" with "scheme = simple_encoder" or download my pre-configured mt32-pi.cfg
- When you power on the mt32-pi, you should see a MiSTer splash screen. If not, check the cable connecting to the mt32-pi to the User port.