MiSTercade Versus (VS) | MiSTer FPGA JAMMA Arcade Linking
Connect your arcade cabinets with MiSTercade VS! This custom cabinet linking service is tailored to your MiSTercade JAMMA arcade-linking needs. No more bumping elbows! Keep your gaming space stress-free and your opponents at arm's length - now that's what we call a true knockout! Do you have what it takes to set the high score for most cabinets linked?
How it Works
MiSTercade VS allows for one MiSTercade (base unit) connect to 2 or more arcade cabinets.
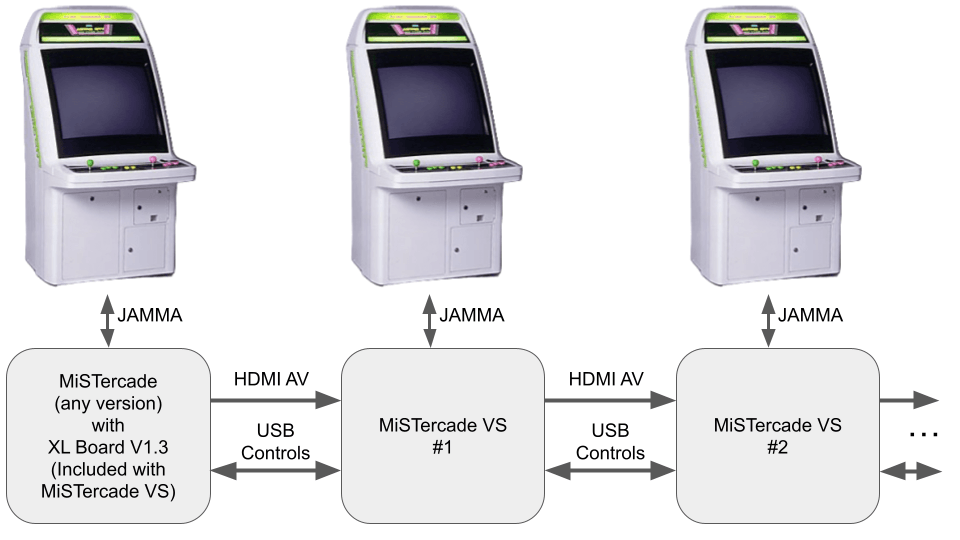
The first cabinet needs a MiSTercade (base unit) to send audio and video to the next cabinet, while receiving the cabinet's controls. The audio and video are sent using a single HDMI cable from the base MiSTercade's XL board (included with each VS setup).
The next cabinet needs a MiSTercade VS (satellite) to receive audio and video from the previous cabinet, and send controls backwards. At the same time, the audio and video are split, and amplified for the next cabinet, as well as receive controls from it.
Theoretically, you can link infinite cabinets together since each receives the same signals as the previous. However, the number of cabinets officially supported is 2.
Use 30mm Grommets to safely route cables through your candy cabinet.
To be clear: each cabinet receives the same audio and video signal. MiSTercade VS does not allow for different cores to be played across different cabinets.

The following image shows how to connect three cabinets together. The MiSTercade (bottom) goes to the first cabinet. The Versus Satellite (middle) goes to the second cabinet and the top Versus Satellite goes to the third cabinet. Additional cabinets can be added using the same methodology, connecting to the previous using the included cables.
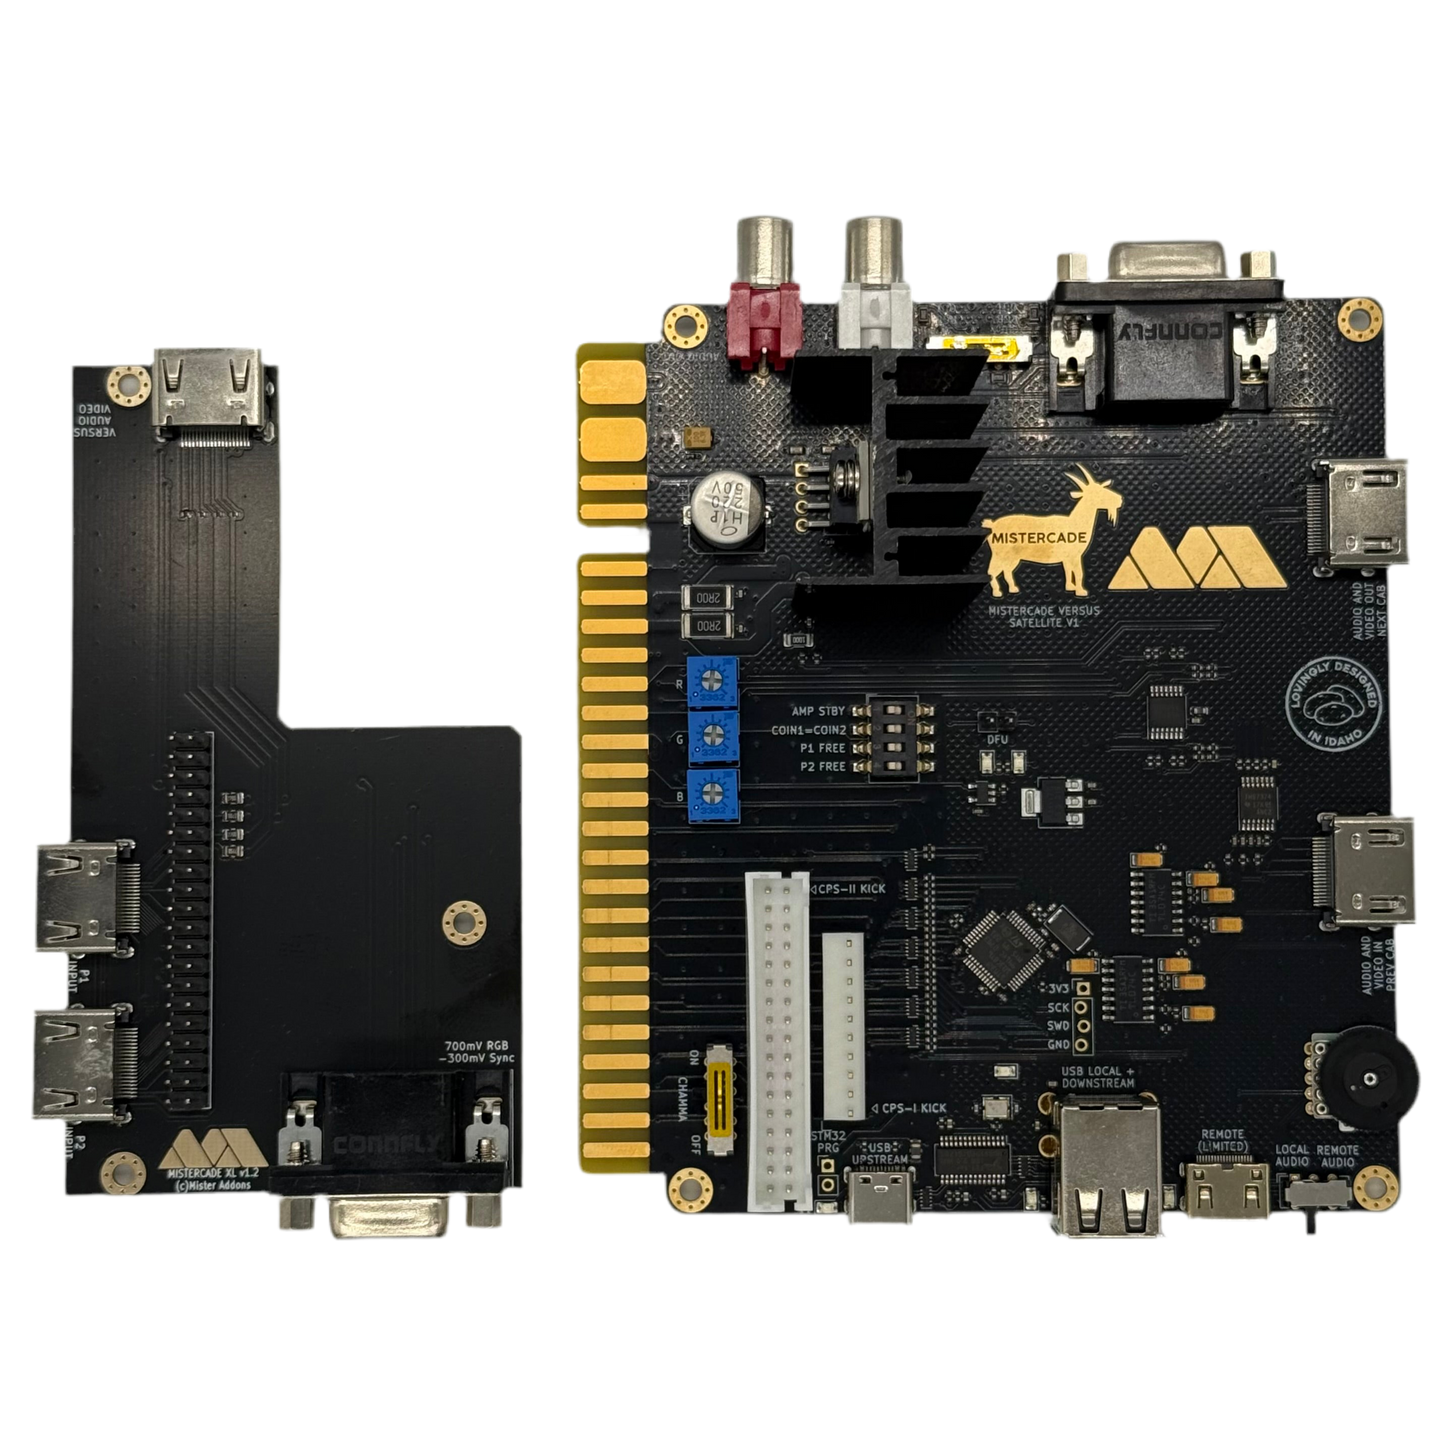
Be sure to use this port on the main MiSTercade unit to send audio and video to the Versus Satellite board:

What's Included
-
1 x MiSTercade VS PCB
- 1 x MiSTercade XL board (replace your existing MiSTercade's XL board)
Not Included
- 10 ft. USB cable (for USB controls)
- 1 x 10 ft. HDMI cable (for audio and video)
Installation
- Replace your MiSTercade's XL board with the included XL board
- Plug one end of the HDMI cable into the HDMI port on the short edge of the XL Board PCB
- Plug the other end of the HDMI cable to the VS board's "AV IN" HDMI port
- Connect the USB-C cable end to the VS board's USB-C Port
- Connect the USB-A cabled end to the MiSTercade base unit's USB A port (might need a specific port for correct player order)
- Plug the JAMMA connector of each cabinet into the respective unit
- Power on both cabinets
Note: Due to the way MiSTer handles player order, MiSTer.ini entries may need to be modified to get player order correct. More details forthcoming!
Compatibility
Works with MiSTercade V1 and MiSTercade V2. If intended to use with MiSTercade V2, add the mappings repository for MiSTercade V1 to downloader.ini. Instructions here: https://github.com/misteraddons/mistercade_mappings
Known Issues
- Some arcade monitors don't like the RGB at max level. Simply back off each potentiometer (turn counterclockwise) a small amount if you see electromagnetic interference on your display.
- Adding a cable ferrite to the HDMI cable will reduce audio hum.
Manual
MiSTercade Versus (VS) | MiSTer FPGA JAMMA Arcade Linking
Connect your arcade cabinets with MiSTercade VS! This custom cabinet linking service is tailored to your MiSTercade JAMMA arcade-linking needs. No more bumping elbows! Keep your gaming space stress-free and your opponents at arm's length - now that's what we call a true knockout! Do you have what it takes to set the high score for most cabinets linked?
How it Works
MiSTercade VS allows for one MiSTercade (base unit) connect to 2 or more arcade cabinets.
The first cabinet needs a MiSTercade (base unit) to send audio and video to the next cabinet, while receiving the cabinet's controls. The audio and video are sent using a single HDMI cable from the base MiSTercade's XL board (included with each VS setup).
The next cabinet needs a MiSTercade VS (satellite) to receive audio and video from the previous cabinet, and send controls backwards. At the same time, the audio and video are split, and amplified for the next cabinet, as well as receive controls from it.
Theoretically, you can link infinite cabinets together since each receives the same signals as the previous. However, the number of cabinets officially supported is 2.
Use 30mm Grommets to safely route cables through your candy cabinet.
To be clear: each cabinet receives the same audio and video signal. MiSTercade VS does not allow for different cores to be played across different cabinets.

The following image shows how to connect three cabinets together. The MiSTercade (bottom) goes to the first cabinet. The Versus Satellite (middle) goes to the second cabinet and the top Versus Satellite goes to the third cabinet. Additional cabinets can be added using the same methodology, connecting to the previous using the included cables.
Be sure to use this port on the main MiSTercade unit to send audio and video to the Versus Satellite board:

What's Included
-
1 x MiSTercade VS PCB
- 1 x MiSTercade XL board (replace your existing MiSTercade's XL board)
Not Included
- 10 ft. USB cable (for USB controls)
- 1 x 10 ft. HDMI cable (for audio and video)
Installation
- Replace your MiSTercade's XL board with the included XL board
- Plug one end of the HDMI cable into the HDMI port on the short edge of the XL Board PCB
- Plug the other end of the HDMI cable to the VS board's "AV IN" HDMI port
- Connect the USB-C cable end to the VS board's USB-C Port
- Connect the USB-A cabled end to the MiSTercade base unit's USB A port (might need a specific port for correct player order)
- Plug the JAMMA connector of each cabinet into the respective unit
- Power on both cabinets
Note: Due to the way MiSTer handles player order, MiSTer.ini entries may need to be modified to get player order correct. More details forthcoming!
Compatibility
Works with MiSTercade V1 and MiSTercade V2. If intended to use with MiSTercade V2, add the mappings repository for MiSTercade V1 to downloader.ini. Instructions here: https://github.com/misteraddons/mistercade_mappings
Known Issues
- Some arcade monitors don't like the RGB at max level. Simply back off each potentiometer (turn counterclockwise) a small amount if you see electromagnetic interference on your display.
- Adding a cable ferrite to the HDMI cable will reduce audio hum.


